Monday, April 22, 2013

Plumbing Debacles

So let me start by saying how much I love the blog Young House Love, so when I saw this post by them I was super excited. Why WOUDN'T you install a dual-flush on your toilet when it's so easy and will make your home more water efficient?
Hi-ho, hi-ho, off to Lowe's I go... 

Lowe's had a conversion kit, but it had a traditional level flush rather than the push button. You push down for #2 and pull up for #1. But my thought was unless we put instructions on the toilet, no one is going to know to pull up for #1 and we'll still be using the same amount of water. So I headed to Home Depot to get the identical kit used by YHL. Back home I arrive, ready to roll up my sleeves and accomplish something!

Off comes the toilet flush lever, easy-peasy.

Lever removed, ready for fancy push-button!
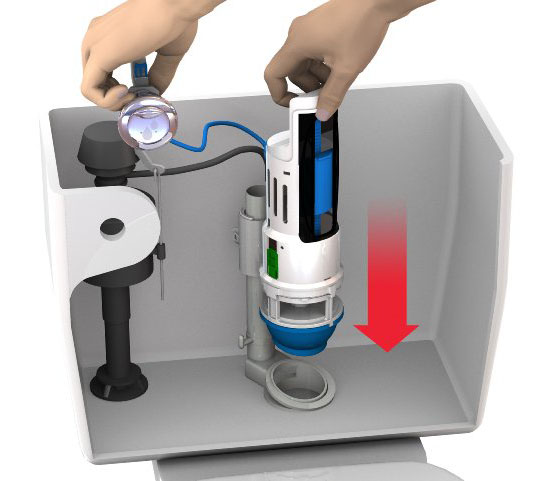
Flush valve removed (note the silicone)

OK, so far so good. Now let's see how to put this baby together! At this point I'm looking at the image in the instructions, and noticing that's not what I'm looking at in my toilet: 
Hmm... I call Ryan in to take a look, and we decide we need to replace the flush valve. No biggie, off to Lowe's again to pick up one of these:  


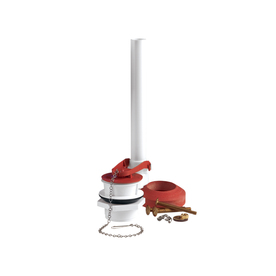
I open the package, start reading instructions, and get to this image: 

Hmm, not sure how I'm going to install that rubber gasket on our one-piece toilet... Oooohhhhh, THAT'S why the silicone was there. SHIT. Now what?


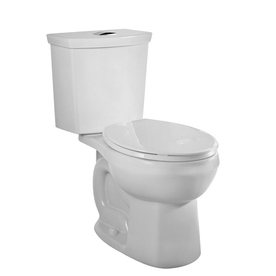
New dual-flush toilet is what.

So I order the new toilet from Lowe's, and we decide to prep for it while we wait for it to arrive at the store. 
Spoiler alert: thankfully we were not living at the house at this point, because we end up being without a crapper for a few days...
Out comes the old toilet
Hmm, that doesn't look good...
We realize we're going to need to replace the toilet flange that's totally rusted out. See those little shims in the upper left that they had been using to level the toilet? Yeah, nicely done. 

As it turns out, the subfloor was totally rotted out as well, and there were old plumbing pipes, so while I laboriously cut away all the rotted subfloors, Ryan worked on running new PVC pipe to the toilet. All this for a more efficient toilet, it better be worth it!
Several hours with the utility knife later...

Of course I neglected to document the patchwork as we filled everything back in, but a day or two later the toilet was ready for pickup and voila!  
New toilet in place, and beginning to lay the new floor tiles...

Isn't she pretty??
So much effort just for a more efficient flush...
Old homes are so unpredictable, I'm learning how naive it is to ever go into any task thinking of it as just a quick job. But it's always an adventure, and educational, gotta love it!

Friday, April 19, 2013

Putting it all back together...

As it turns out, demolition goes a lot faster than construction... who knew??

I knew the rebuilding phase would be slower than demo was, but I hadn't anticipated just how slow. It's been SEVEN MONTHS and it feels like we've gotten almost nothing done. In reality, we have actually gotten quite a bit done, it's just been a lot of smaller, less ground-breaking things that aren't as noticeable as when you are tearing entire walls down. Plus we had Christmas in there, so we've been trying to take a little bit of a break to let the funds replenish a bit, you know how that goes!

So here's a rundown of what we (read: mostly Ryan) have accomplished thus far:
  • Replaced all the first floor door hardware inside and out with new oil rubbed bronze levers (50% off at Lowe's, I love them!!!) 
    Out with the old, in with the new!
  • Demolished basement stairs, re-framed floor, and laid new floor, complete with trap door for indoor basement access & new custom-built access ladder 
    Basement access progress
  • Ran new gas lines for dryer, stove, and grill (with provisions for future tankless water heater in the basement) 
    Running new gas lines in the crawl space
  • Ran new water & drain lines for washing machine
  • Ran new outlets in all exterior walls
  • Caulked, primed & painted ceilings, walls, cabinet & trim in bathroom and both bedrooms
    4 gallons of primer & 10 tubes of caulk consumed so far, more on that later...
  • Framed new wall between the bathroom & office/laundry room 
  • Demolished stair wall in living room and framed new section of full-height wall between the office/laundry/stairs and living room 
    Bye bye wall!
  • Built new headers above the sliding glass door & all existing windows 
    Ryan admiring his handiwork
  • Replaced the toilet, complete with new PVC flange to replace the old rotted one & patched subfloor (I'll go into more detail in a future post on this debacle) 
  • Laid new stick-on vinyl tiles in the bathroom (cheap facelift!) 
  • ORB'd the old bathroom fixtures (spray painted them Oil Rubbed Bronze, our finish of choice for the house) 
    Thank goodness for ORB spray paint!
  • Replaced the single-pane kitchen window with a new, larger vinyl double-hung window
    I can see the front yard from the sink now!
  • Built a temporary counter for the kitchen sink out of plywood & 2x4s
    No more dishes in the tub, hooray!
  • Removed the tub doors and hung a curved shower curtain rod to create more space in our tiny tub
  • Removed the old shower grab-bars, for the reason above (24" wide tub, people)
  • Removed existing tongue-and-groove ceiling in the kitchen, to be re-used at a later date 
     
    Salvaged wood and ceiling droppings
  • Removed all existing wood sheathing, insulated the exterior walls and installed new OSB sheathing

And the biggest accomplishment of all, on November 11th WE MOVED IN!!!

Since then we have been enjoying life and letting the bank accounts rest, but now spring has finally sprung and we are ready to get back to work. More updates to come (hopefully in a more timely manner!)